Setup
This guide explains how to set up your environment to run Shesha applications locally, including both the backend (.NET) and frontend (React.js), with Microsoft SQL Server running in Docker or directly on your Windows machine.
Tools You Need
- Git – Required for accessing code from git-based version control systems.
- Docker – Used to run Microsoft SQL Server as a containerized application.
- .NET 8 SDK & Runtime – Needed for the backend (ASP.NET Core) and for SQL-Package to work.
- Node.js 22 / 21 – Required to run the Shesha frontend (React.js).
- SQL-Package – Imports the starter database from a
.bacpacfile. - Visual Studio Code (or an AI-infused fork) – Recommended IDE for editing both frontend and backend code. (Note: Visual Studio is no longer supported on Mac OS).
- Microsoft Visual Studio – Recommended IDE for editing backend code on Windows.
- Database Client Extension on VSCode – To connect to SQL Server, browse databases, and run queries. Download extension
Tip: Some commands may require administrator privileges. In that case, prefix them with
sudo. On Windows, you may need to enable 'sudo' in your settings first if it is not already available in your CLI shell.sudo ...
1. Download & Install Docker
Windows Users Can Skip This if they have SQL Server on Windows
Download Docker Desktop for Windows from docker.com and install it.
Once Docker is running, you can use docker commands in the terminal to create, start, stop, and manage containers.
For more details:
Quickstart: Install and connect to SQL Server in Docker
1.1 Pull SQL Server Image
docker pull --platform linux/amd64 mcr.microsoft.com/mssql/server:2022-latest
1.2 Run the Container
Once the SQL Server image is downloaded, create a container:
docker run --platform linux/amd64 -d -e "ACCEPT_EULA=Y" -e "MSSQL_SA_PASSWORD=@123Shesha" \
-p 1433:1433 --name SQL_Server_Docker \
mcr.microsoft.com/mssql/server:2022-latest
After running this command, SQL Server will be running in a container with the following credentials:
- User ID:
sa - Password:
@123Shesha
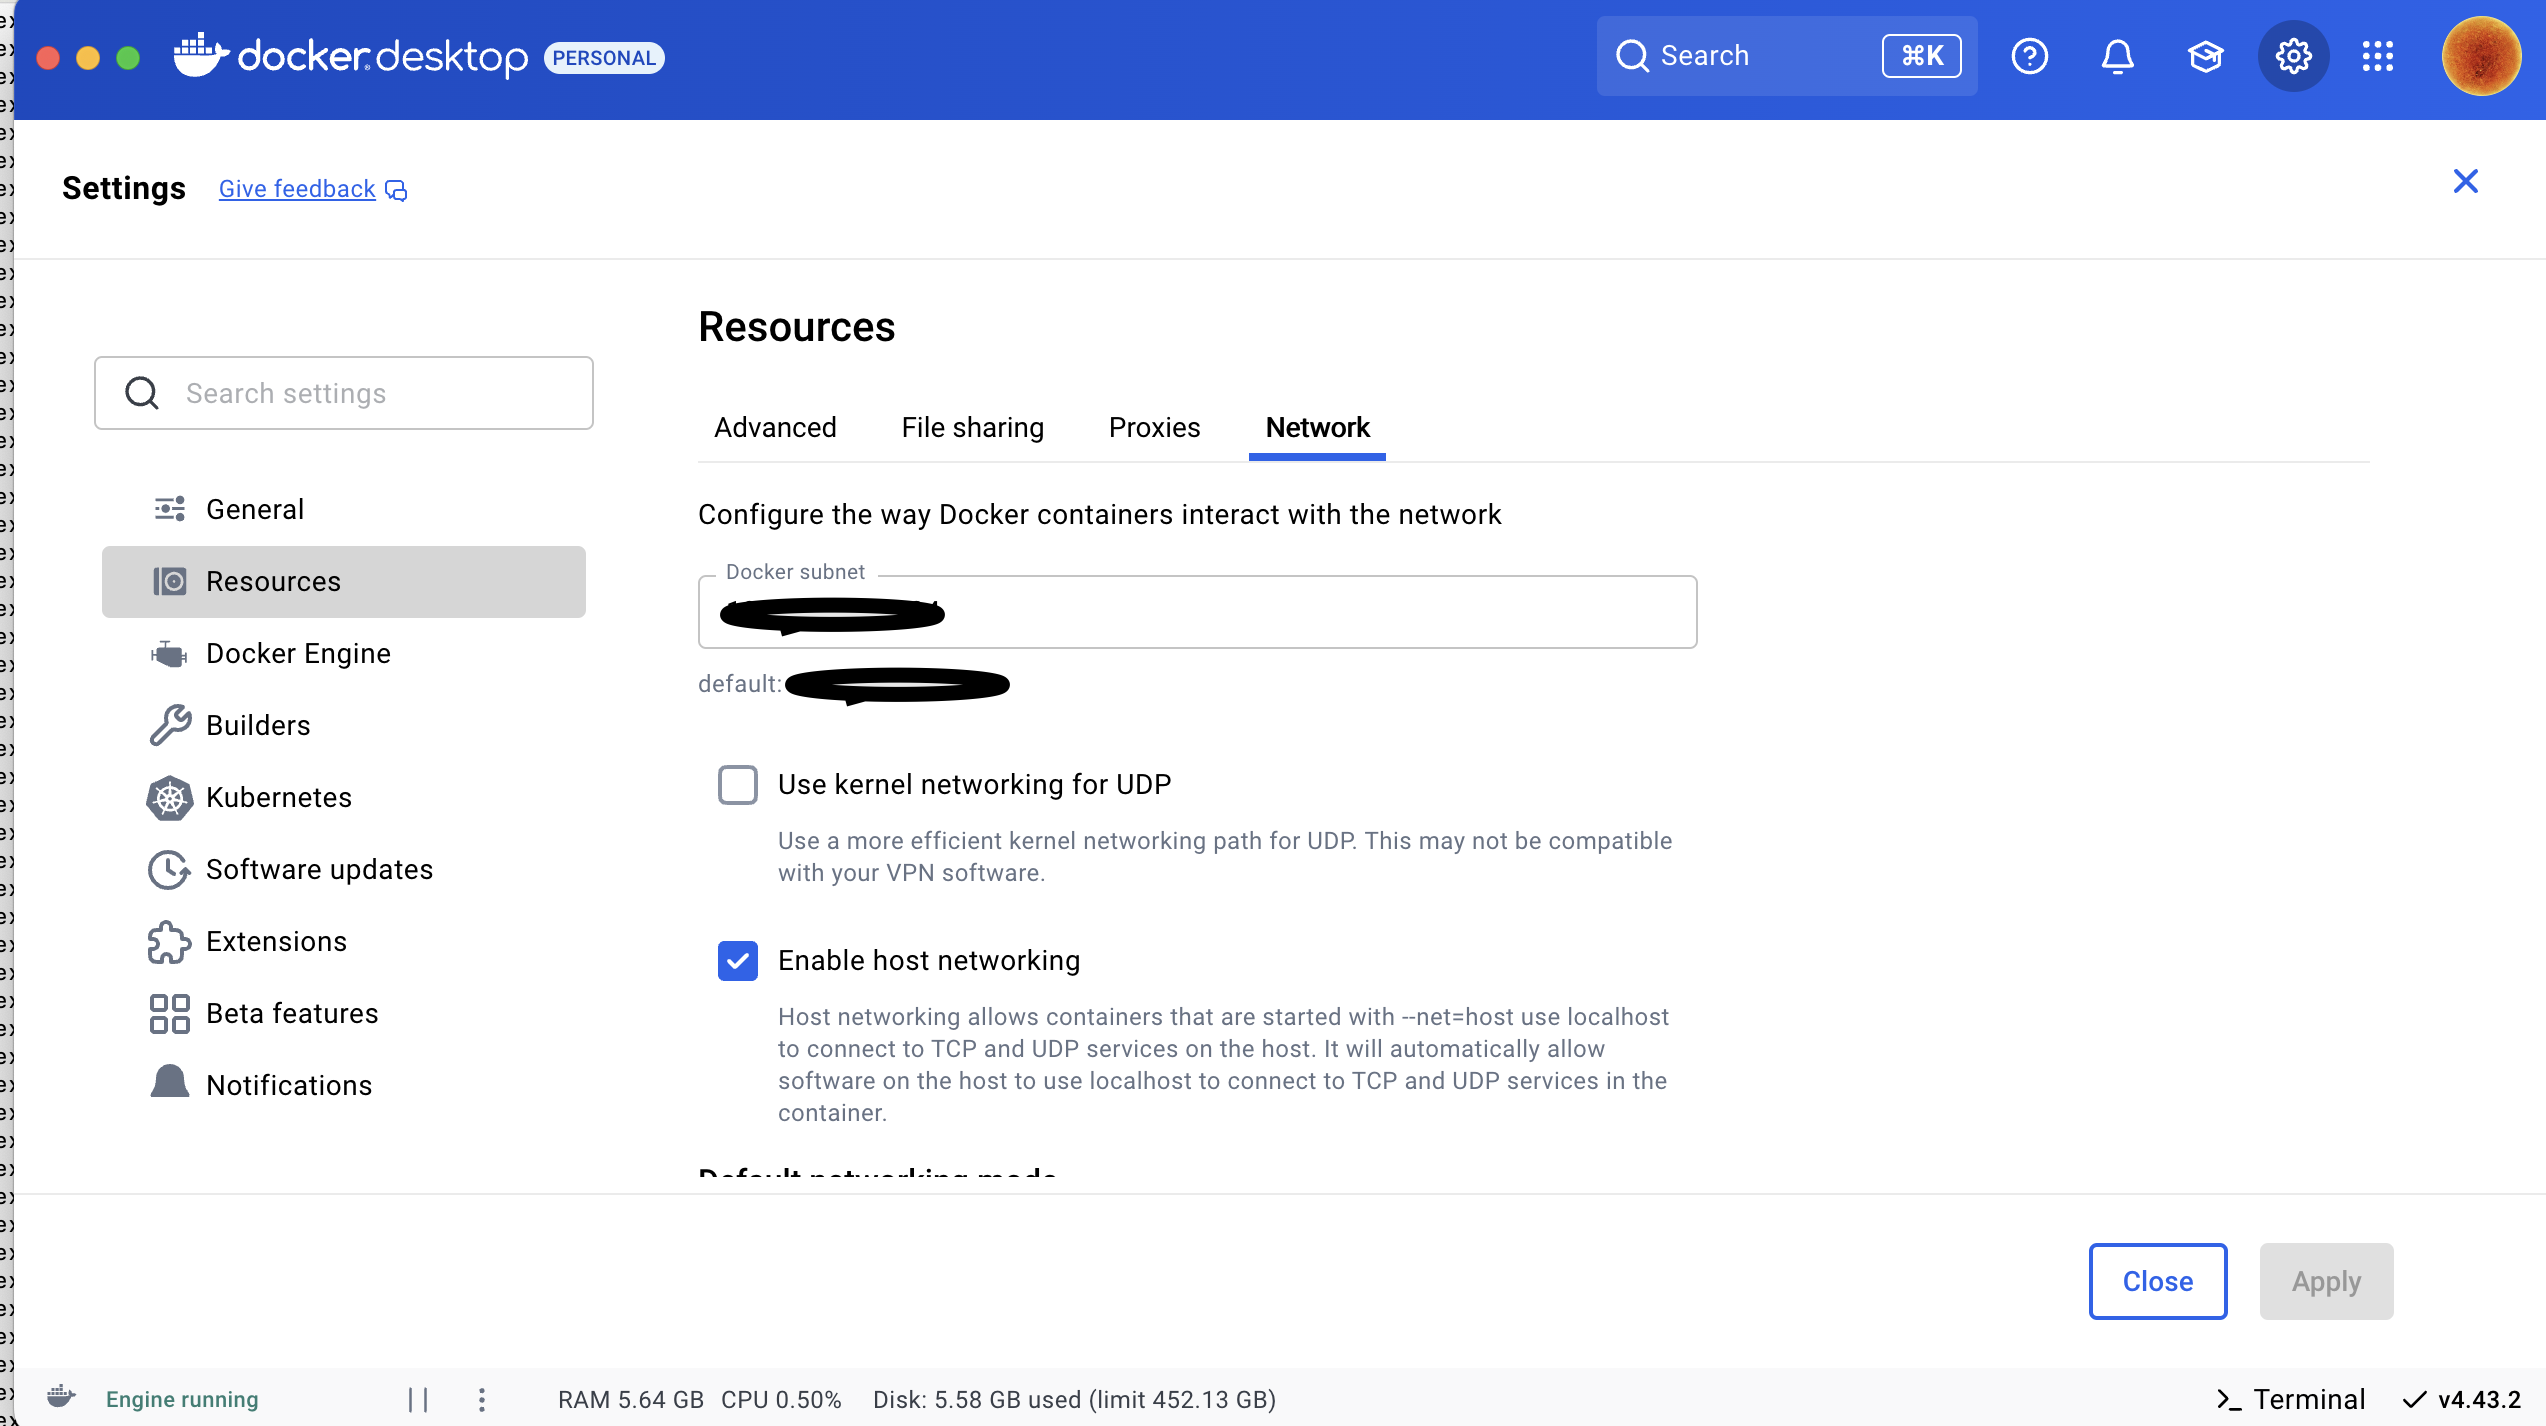
1.3 Enable Host Networking in Docker
Make sure to enable host networking in Docker Desktop so that your machine’s network calls can access the container’s network:
2. Importing the Starter Database into SQL Server
On Windows, you can use Microsoft SQL Server Management Studio's Import Data-tier Application wizard. On macOS, we use SQL-Package instead.
2.1 Install .NET 8
If not already installed, download the Arm64 (Apple Silicon) or x64 (Intel) version here:
.NET 8 Download
2.2 Install SQL-Package
dotnet tool install -g microsoft.sqlpackage
After installation, follow the terminal instructions to add SQL-Package to your PATH.
Close and reopen your terminal after installation.
Documentation: Install SQL-Package
2.3 Cloning the Shesha Project
-
Create a fork of the Shesha Framework Repo to your GitHub account. The repository contains:
- ...
- shesha-core – The main Shesha "Core" backend class libraries
- shesha-functional-tests – The
Shesha Functional Testingproject that is using the latest framework code on the current branch of the repository- Adminportal – React.js frontend
- Backend – ASP.NET Core backend
- Database – Seeded SQL Server
.bacpacfile
- shesha-reactjs - The main Shesha npm library code
- shesha-starter – The
Shesha Starterproject that is using the latest public framework on the current branch of the repository- Adminportal – React.js frontend
- Backend – ASP.NET Core backend
- Database – Seeded SQL Server
.bacpacfile
-
Once you have the fork on your GitHub account, you can now clone it to your machine.
cd ~
git clone https://github.com/<<your-github-username>>/shesha-framework
2.4 Importing the Database
In the cloned project directory, you will find a .bacpac file in the shesha-starter/database directory:
Example location:
~/shesha-framework/shesha-starter/database/ShaProjectName.bacpac
Run:
sqlpackage /Action:Import /SourceFile:"./shesha-framework/shesha-starter/database/ShaProjectName.bacpac" /TargetConnectionString:"Server=localhost,1433;Initial Catalog=ShaProjectName;Persist Security Info=False;User ID=sa;Password=@123Shesha;MultipleActiveResultSets=False;Encrypt=True;TrustServerCertificate=True;Connection Timeout=30;"
Once complete, use your choice of SQL Server client and verify that the ShaProjectName database exists.
Connect using the connection string in section 3.2 below.
3. Running the Shesha-Core Backend
3.1 Open shesha-core in VS Code / Microsoft Visual Studio
Open the shesha-core directory in your code editor.
3.2 Update Connection String
Edit:
/src/Shesha.Web.Host/appsettings.json
Replace the Default connection string:
{
    "ConnectionStrings": {
        "Default": "Server=localhost,1433;Initial Catalog=ShaProjectName;Persist Security Info=False;User ID=sa;Password=@123Shesha;MultipleActiveResultSets=False;Encrypt=True;TrustServerCertificate=True;Connection Timeout=30;"
    }
}
3.3 Build & Run
From the ~/shesha-framework/shesha-core directory:
Expected directory structure:
backend
├── src
├── nupkg
├── .nuget
├── test
└── ...
Build:
dotnet build
Run:
dotnet run --project src/Shesha.Web.Host/Shesha.Web.Host.csproj --urls "http://localhost:21021;https://localhost:44362"
SSL Note: If you do not have a local development certificate, install and trust it:
dotnet dev-certs https --trust
4. Running the Frontend
Navigate to the shesha-reactjs directory from the shesha-framework root:
cd ~/shesha-framework/shesha-reactjs
npm install
npm run dev
The frontend should now be running locally and connected to your backend.
Note: Ensure your backend is running before starting the frontend to establish proper connectivity.
At this point, you have the running shesha-core and shesha-reactjs solutions. You may want to make certain changes to the code, for example:
- Change properties of an entity
- Create a special endpoint
- etc.
These backend changes are done by modifying the code in the various class libraries found in the shesha-core solution.
Frontend changes are done by modifying the code in the shesha-reactjs solution. Here the changes could be:
- Extending functionality of certain React providers or components
- Implementing new Shesha components
- etc.
The world is your oyster. What is important for any Shesha contributor is to fix or implement according to what a specific GitHub issue requires, and to maintain the Shesha standard of coding.
GitHub issues can be found here. We advise developers to look at the current open and closed Pull Requests here.
If a developer wants to open a discussion, we encourage them to do so here.